
Affichage des articles dont le libellé est tutorial. Afficher tous les articles
Affichage des articles dont le libellé est tutorial. Afficher tous les articles
jeudi 8 mai 2014
jeudi 17 avril 2014
Blender Fixes mirror / SL import / UV maps
Here are some simple solution to bugs that i had going on using blender :
Blender > Mirror axis problem why when i use the mirror option sometimes it works perfectly and sometimes it ends up all over the the place?
Because both cursors (3d cursor and the origin of your object) need to be set on the same axis to make it work.
In object mode
Shift + S > Cursor to center
(somebody told me > Its Shift+C by default but i never changed it and its shift + S to me)
Ctrl + Shift + Alt + C > Origin to 3d cursor
(ikr who ever invented that one must have been having a bad day)
Tada problem fixed !
Second life > Importing objects in parts. why when I import an object that has two parts or more they have moved when i upload?
Because you need to apply the location / rotation / scale to tell the object to remember and save it.
In object mode
Ctrl+A > Apply location / scale / rotation
Bam another one out the way
Blender > Distorted UV maps : why even when i spend time marking seams my maps turn out messy and distorted. (this one drove me crazy)
Same problem and solution as above :
Because you need to apply the location / rotation / scale to tell the object to remember and save it.
In object mode
Ctrl+A > Apply location / scale / rotation
I hope that give you a little bit of help for you bugs, leave a comment if you use :)
Blender > Mirror axis problem why when i use the mirror option sometimes it works perfectly and sometimes it ends up all over the the place?
Because both cursors (3d cursor and the origin of your object) need to be set on the same axis to make it work.
In object mode
Shift + S > Cursor to center
(somebody told me > Its Shift+C by default but i never changed it and its shift + S to me)
Ctrl + Shift + Alt + C > Origin to 3d cursor
(ikr who ever invented that one must have been having a bad day)
Tada problem fixed !
Second life > Importing objects in parts. why when I import an object that has two parts or more they have moved when i upload?
Because you need to apply the location / rotation / scale to tell the object to remember and save it.
In object mode
Ctrl+A > Apply location / scale / rotation
Bam another one out the way
Blender > Distorted UV maps : why even when i spend time marking seams my maps turn out messy and distorted. (this one drove me crazy)
Same problem and solution as above :
Because you need to apply the location / rotation / scale to tell the object to remember and save it.
In object mode
Ctrl+A > Apply location / scale / rotation
I hope that give you a little bit of help for you bugs, leave a comment if you use :)
jeudi 24 octobre 2013
Tutorial : Easy way to use ambient occlusion textures (AO-shadow maps) with Photoshop.
Using ambient occlusion in 3 steps
1 - Open the base texture you want to use in Photoshop in this case i will use suede.

2 - Files menu > import > choose your ambient occlusion texture

3 - Layer menu > Multiply and you have a grate result.

mardi 22 octobre 2013
Second life Linden dollars to USD dollars with paypal tutorial
YOU NEED :
- Have second life account > Dose not need to be premium.
- You need to have connected inworld to second life at least once.
- Have a verified Paypal account with credit card (not debit card) linked. For now there is no exception to this rule it seems that in america a credit card is not obligatory but in all other county's it is.
Step 1 = link second life account to paypal account
Dashboard > https://secondlife.com/my > login
> Add Paypal
> Enter paypal email and password

Step 2 = purchase an item with dollars through paypal on Marketplace or buy lindens
This step is only if you are new to SL and have not bought any lindens or land etc :
Purchase Small item maybe 2 USD$ for example this item
: https://marketplace.secondlife.com/p/Sneakers-Cupidon-FULL-PERM/5416629

The purchase activates your payment information and will allows you change linden to dollars after 14 days. with limits as follows :
.png)
AFTER 14 DAYS
Step 3 = activate advanced interface :
Linden Exchange menu > Manage > L$ Exchange Settings
> Choose advanced > Submit

Step 4 = convert Lindens to dollars :
Linden Exchange menu > Manage >Sell
- Be sure to check that your trading limits for sell are not set to 0L$
> if it is still at 0L$ maybe you have not waited 14 days, if you have waited 14 days you can submit a ticket and ask for help : https://support.secondlife.com/create-case/
> In Offer to Sell Linden Dollars box> add number of lindens to exchange> Add exchange rate wanted ( I always put 248 and they are sold in 5 min)
> Offer to sell

> Login again
> Check Sell information
> Place sell order

You will see this confirmation message :

You will receive an email saying you have placed an order.
You will receive a second email when your sale order is filled. The dollars are then on your second life account and need to be processed.
Step 4 = transfer dollar to paypal
Dashboard > Linden Exchange menu > Manage > Process Credit

> Select correct paypal account if it is not already selected
> Request Process Credit Button at the bottom
> Enter amount (must be = or lower then USD balance)
 > Login
> Confirm
> Processing takes up to 5 working days and it generally dose take that long. You will receive an email when processing is complete.
I hope this tuto helps you out :)
- You need to have connected inworld to second life at least once.
- Have a verified Paypal account with credit card (not debit card) linked. For now there is no exception to this rule it seems that in america a credit card is not obligatory but in all other county's it is.
Step 1 = link second life account to paypal account
Dashboard > https://secondlife.com/my > login
> Add Paypal
> Enter paypal email and password

Step 2 = purchase an item with dollars through paypal on Marketplace or buy lindens
This step is only if you are new to SL and have not bought any lindens or land etc :
Purchase Small item maybe 2 USD$ for example this item
: https://marketplace.secondlife.com/p/Sneakers-Cupidon-FULL-PERM/5416629

The purchase activates your payment information and will allows you change linden to dollars after 14 days. with limits as follows :
.png)
AFTER 14 DAYS
Step 3 = activate advanced interface :
Linden Exchange menu > Manage > L$ Exchange Settings
> Choose advanced > Submit

Step 4 = convert Lindens to dollars :
Linden Exchange menu > Manage >Sell
- Be sure to check that your trading limits for sell are not set to 0L$
> if it is still at 0L$ maybe you have not waited 14 days, if you have waited 14 days you can submit a ticket and ask for help : https://support.secondlife.com/create-case/
> In Offer to Sell Linden Dollars box> add number of lindens to exchange> Add exchange rate wanted ( I always put 248 and they are sold in 5 min)
> Offer to sell

> Login again
> Check Sell information
> Place sell order

You will see this confirmation message :

You will receive an email saying you have placed an order.
You will receive a second email when your sale order is filled. The dollars are then on your second life account and need to be processed.
Step 4 = transfer dollar to paypal
Dashboard > Linden Exchange menu > Manage > Process Credit

> Select correct paypal account if it is not already selected
> Request Process Credit Button at the bottom
> Enter amount (must be = or lower then USD balance)
 > Login
> Confirm
> Processing takes up to 5 working days and it generally dose take that long. You will receive an email when processing is complete.
I hope this tuto helps you out :)
mercredi 2 octobre 2013
Uploading your mesh .dae files to you second life account step by step
1) To upload mesh content you must payment information on file : Billing Information
2) To upload mesh content you must complete the mesh tutorial : Mesh Tutorial for the Main Grid
3) You need a mesh enabled viewer such as Second life viewer or Singularity
4) In you SL viewer go to Build > Upload > Model.
5) A window will open allowing you to select a .dae files from your computer
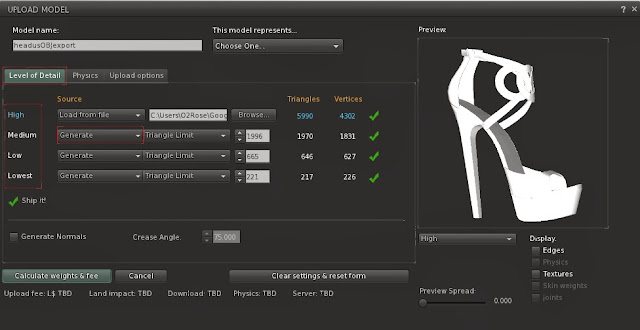
6) first tab "level of details" LOD
LOD = Level of Detail
What is LOD?
LOD is the viewing distance at which the detail levels change. It means that the detail of your object reduces the more you zoom out from it. This is defined by the number of triangles and verticals of an object.
The LOD can be auto-generated or you can create new .dae files with less verticals yourself. The ones you create yourself are usually better quality but more work of course.
If you click on High, Medium, Low, and Lowest on the left side of the tab you will be able to visualize how your object looks with the chosen number of verticals. Notice how the object's complexity is reduced at each level.
For more information on LOD check this wiki poste : http://wiki.secondlife.com/wiki/Mesh_and_LOD
LOD tab settings
If you have made your own .dae LOD files you can use drop down menu to choose "Load from file" and select your .dae LOD file
If not you can try these settings :
- High > your object .dae file
- Medium > Load from above
- Low > I usually reduce this level (except for clothes and buildings)
- Lowest > for furniture you can put this level to 0 (not for clothes and buildings)
Then you can clic on calculate weights and fees. The LOD will change the weight and fees each time you modify them. Each time you change it you have to recalculate, you can play with the settings until you find a price/weight that is acceptable for you. Keep in mind that the physics tab will also make a difference on weight and fees.
7) "Physics" tab
What is physics? (or collision file)
Wiki has quite a detailed post on physics : http://wiki.secondlife.com/wiki/Making_Mesh_Physics
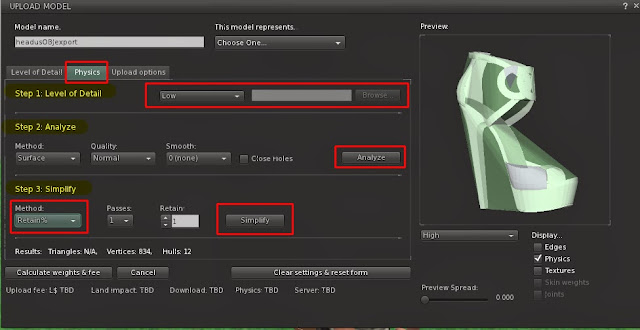
Basically it means what will happen when you interact with the object, when you walk into it, sit on it, stand on it, its what makes your object hard. This is mostly important for furniture and house parts that need openings ect... but for all the other objects the lower the physics the less prims it will use (generally speaking because it is not an exact science at all).
The same applies here as for the LOD, physics can be auto-generated or you can create .dae files with less verticals and more precise yourself. The ones you create yourself are usually better quality but more work.
Phisics tab
Step 1 : Level of detail
> Choose from the drop down menu that says "choose one"
The choices are high, medium, low, lowest, from file.
When you have chosen one of these options you will see that your item in preview window is highlighted in yellow. This shows you what how the physics will behave with the chosen option.
Each option combinations will give you different results that i will not go into in this tuto.
I will just give you a few examples of settings that i use regularly. The best way will be what works for you but you can try these out :
For avatar attachments and dead objects like lamps, clocks, vase :
Step 1 : low or lowest (sometimes it doesn't accept low)
Step 2 : Analyze
Step 3 : From method menu choose "retain %" put retain N° to 1 then click simplify
For house parts what need to have a hole in for example or furniture you need to sit on.
Step 1 : High
Step 2 : Analyze
Step 3 : From method menu choose "retain %" play with N° then click simplify, each time you will see the result change in the preview menu, find the best option that works with your object.
Upload options Tab :
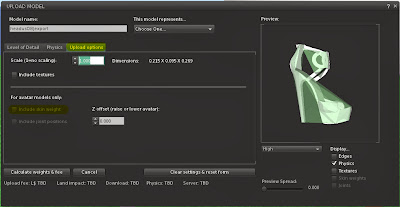
Here you can check the size/scale of your item. Sometimes when exporting we do not pay attention to scale so this is a very useful tool. Adjust the scale if necessary to obtain the right dimensions.
Otherwise this Tab is exclusively for rigged items such as clothes and avatars.
If you item is rigged simply check the the "include skin weight" option.
Joints are not usually necessary unless you know otherwise.
Finishing upload :
When all the steps are complete
> Name your object
> Choose what it represents although i'm not sure that actually dose anything.
> Calculate weights and fee and wait for price and details to show
> Upload
IMPORTANT TIPS :
Watch the details at the bottom of the window under the calculate weights and fee tab :
Each time you change an option it will affect the land impact, physics and fees. Remember to calculate and check as you change things to help find the best combination.
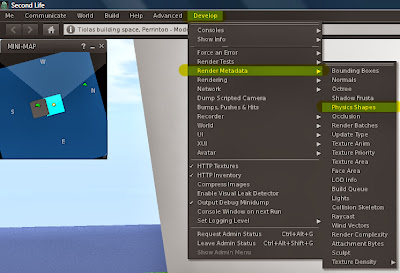
To see the physics of your objects inworld : How can i see physics
> Show advanced menu :
Windows - Ctrl+Alt+D
Mac - Ctrl+Opt ⌥+D
Linux - Ctrl+Alt+D
> Choose Advanced menu > Show Develop Menu to enable it.
> Go to Render Metadata > Physics Shapes
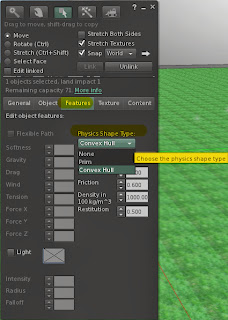
When you upload furniture or houses : My physics are not working
By default you object is physics shape is set to "Convex Hull", in order to use the physics settings you chose, you must change this to "Prim". This can also change the prim count.
My upload .dae file is making me crash
Sometimes your viewer will decide it dose not like a file, changing the name of the file each time before uploading is a workaround that often helps.
More references :
Second life tutorial for uploading mesh : http://community.secondlife.com/t5/English-Knowledge-Base/Uploading-a-mesh-model/ta-p/974185
2) To upload mesh content you must complete the mesh tutorial : Mesh Tutorial for the Main Grid
3) You need a mesh enabled viewer such as Second life viewer or Singularity
4) In you SL viewer go to Build > Upload > Model.
5) A window will open allowing you to select a .dae files from your computer
6) first tab "level of details" LOD
LOD = Level of Detail

What is LOD?
LOD is the viewing distance at which the detail levels change. It means that the detail of your object reduces the more you zoom out from it. This is defined by the number of triangles and verticals of an object.
The LOD can be auto-generated or you can create new .dae files with less verticals yourself. The ones you create yourself are usually better quality but more work of course.
If you click on High, Medium, Low, and Lowest on the left side of the tab you will be able to visualize how your object looks with the chosen number of verticals. Notice how the object's complexity is reduced at each level.
For more information on LOD check this wiki poste : http://wiki.secondlife.com/wiki/Mesh_and_LOD
LOD tab settings
If you have made your own .dae LOD files you can use drop down menu to choose "Load from file" and select your .dae LOD file
If not you can try these settings :
- High > your object .dae file
- Medium > Load from above
- Low > I usually reduce this level (except for clothes and buildings)
- Lowest > for furniture you can put this level to 0 (not for clothes and buildings)
Then you can clic on calculate weights and fees. The LOD will change the weight and fees each time you modify them. Each time you change it you have to recalculate, you can play with the settings until you find a price/weight that is acceptable for you. Keep in mind that the physics tab will also make a difference on weight and fees.
7) "Physics" tab

What is physics? (or collision file)
Wiki has quite a detailed post on physics : http://wiki.secondlife.com/wiki/Making_Mesh_Physics
Basically it means what will happen when you interact with the object, when you walk into it, sit on it, stand on it, its what makes your object hard. This is mostly important for furniture and house parts that need openings ect... but for all the other objects the lower the physics the less prims it will use (generally speaking because it is not an exact science at all).
The same applies here as for the LOD, physics can be auto-generated or you can create .dae files with less verticals and more precise yourself. The ones you create yourself are usually better quality but more work.
Phisics tab
Step 1 : Level of detail
> Choose from the drop down menu that says "choose one"
The choices are high, medium, low, lowest, from file.
When you have chosen one of these options you will see that your item in preview window is highlighted in yellow. This shows you what how the physics will behave with the chosen option.
Each option combinations will give you different results that i will not go into in this tuto.
I will just give you a few examples of settings that i use regularly. The best way will be what works for you but you can try these out :
For avatar attachments and dead objects like lamps, clocks, vase :
Step 1 : low or lowest (sometimes it doesn't accept low)
Step 2 : Analyze
Step 3 : From method menu choose "retain %" put retain N° to 1 then click simplify
For house parts what need to have a hole in for example or furniture you need to sit on.
Step 1 : High
Step 2 : Analyze
Step 3 : From method menu choose "retain %" play with N° then click simplify, each time you will see the result change in the preview menu, find the best option that works with your object.
Upload options Tab :
Here you can check the size/scale of your item. Sometimes when exporting we do not pay attention to scale so this is a very useful tool. Adjust the scale if necessary to obtain the right dimensions.
Otherwise this Tab is exclusively for rigged items such as clothes and avatars.
If you item is rigged simply check the the "include skin weight" option.
Joints are not usually necessary unless you know otherwise.

Finishing upload :
When all the steps are complete
> Name your object
> Choose what it represents although i'm not sure that actually dose anything.
> Calculate weights and fee and wait for price and details to show
> Upload
IMPORTANT TIPS :
Watch the details at the bottom of the window under the calculate weights and fee tab :
Each time you change an option it will affect the land impact, physics and fees. Remember to calculate and check as you change things to help find the best combination.
To see the physics of your objects inworld : How can i see physics
> Show advanced menu :
Windows - Ctrl+Alt+D
Mac - Ctrl+Opt ⌥+D
Linux - Ctrl+Alt+D
> Choose Advanced menu > Show Develop Menu to enable it.
> Go to Render Metadata > Physics Shapes

When you upload furniture or houses : My physics are not working
By default you object is physics shape is set to "Convex Hull", in order to use the physics settings you chose, you must change this to "Prim". This can also change the prim count.

My upload .dae file is making me crash
Sometimes your viewer will decide it dose not like a file, changing the name of the file each time before uploading is a workaround that often helps.
More references :
Second life tutorial for uploading mesh : http://community.secondlife.com/t5/English-Knowledge-Base/Uploading-a-mesh-model/ta-p/974185
Inscription à :
Articles (Atom)